Sunday, September 23, 2012

Film Photography: Visita ao Zoo


Filme é coisa do passado, certo? Mais ou menos. Algumas pessoas ainda insistem no filme. Não é tão fácil como antigamente, mas em Piracicaba, minha cidade natal, conheço dois lugares que ainda revelam filmes coloridos. É possível comprar filmes nas lojas de fotografia, mas comprar no Ebay sai muito mais barato. Há também  a moda da Lomografia, mas não vou falar dela aqui.

Film photography  is dead, right. I would not be so sure. Some people still prefer analogic photograpy. It is not so easy to find photo shops which are still  processing film. However I know two places at Piracicaba, my hometown, that process coloured film. You  still can buy very cheap film st at Ebay.  There is a new trend called Lomography, but I am not going to discuss it here.

O Zoológica Municipal de Piracicaba fica no meu bairro. Faz mais de dez anos que eu não ia lá. Como a entrada é gratuita, resolver tirar algumas fotos lá

The Piracicaba's Zoo is located on my neighborhood. It has beem more than a decaded that I do not visit it. As the entrance is free, I decided to go there and take some shoot.

Equipamento/Equipment

Eu usei a Canon 3000N Date que comprei no Mercado Livre por R$200.
I used Canon 3000N Date that I bought from Mercado Livre, an "Ebay" for Argentine and Brazil

O filme é um Ilford XP2, um filme britânico que, embora seja preto e branco, pode ser revelado como se fosse colorido, ou seja, ele é cromogênico. Comprei no Ebay.
The filme is the british Ilford XP2. It is a cromogenic film. The final result is black'n'white, but is processed like a color film. Bought at Ebay.


Algumas Fotos/ Some Shots


Arara/Macaw


Avestruz/Ostrich


Iguana


Ilha dos Macacos Pregos/Robust capuchin monkey's island

Jabuti/Tortoise


Jaguatirica/Ocelot


 Pavão/Peacock


Tucano/Toucan


Tuesday, September 11, 2012

Learn, Develop, Package and Ship!


After more than 6 years writing code that would anyway end up  in a mobile phone, I finally wrote one that people can opt out :-)

I am in pretty busy stage of my life trying to finish my Master before the end of the year. But I found a couple of hours to learn something about AndEgine. It is a Game Engine for Android. that I learned about in the StackOverflow site. You certainly should give it a try. It makes the thing pretty easy.

So I tried to implement something simple and silly: the classical bouncing ball example. I used the Physical Extension of AndEngine to make the ball react to shaking and gravity. The physics are not perfect : how can it be if you are using 2D vectors for a 3D world? Here is the result:


And then I thought: "Why not turning this knowledge I've just acquired into a product?". So I put this lovely Live Wallpaper  in the Google Play. Click on the badge bellow to get it :

Android app on Google Play


Some stats from the first week:

  • 35 installs
  • 20 of them are active
  • Users from US, Italy, Spain, Egypt, India, Chile, Panamá, Croatia. 
  • Mostly Android 2.3
Those numbers give some insights to those wondering whether to enter or no in the mobile market.  The app is simple, I haven't done any announcement about it so far, and yet it got pretty decent download numbers. Of course, it's a free app, so people are more willing to download it.  


Sunday, August 26, 2012

Swapping two variables without using a temp variable

That is something I learned yesterday and I found it very cool. Thus it is something I must share.

I remember the swap algorithm was taught  in the very first days of college. It is very basic algorithm, but it is used in the foundations of several other algorithms. Until now,  it seemed  to me pretty obvious that its implementation would be inevitably (in C++03):

template<typename T>
void swap(T& x, T& y){
        T temp = x;
        x = y;
        y = temp;
}

In other words, it would always require at least 3 registers for the exchange.

If you are working in a pretty limited environment, a micro-controller for instance, you may not have 3 registers available for use. Therefore you cannot do the swap.

Well, that was I thought until yesterday. Then, I found I should review some material from my old "reduction of logical circuits" class  instead of playing Doom3 (It's kind of old game now, but it is only 10 bucks at iTunes!).

If your data is suitable for bitwise operations then you can do the follow (in C):

void swap(int* x, int* y){
    *x ^= *y;
    *y ^= *x;
    *x ^= *y;
}   

Why does it work ?

Explanation can be found at Wikipedia, but I intend to be more didactic here. Firstly, we need to remember some properties of the exclusive-or (xor) operation:

  • P1 - Commutativity  x^y = y^x
  • P2 - Associativity      (x^y)^z = x^(y^z)
  • P3 - x^x = 0
  • P4 - x^0 = x

So let's step through the algorithm. We are going to use two registers: A which initially will hold the value for x, and B which will hold for y. Thus, we have before the call to swap:

A x
y

Then we execute *x ^= *y  or, to be clearer *x = *x ^ *y :

A x^y
B y

Okay, we still cannot apply any of the properties above. So let's move to the next line *y = *y ^ *x . But remember that x in the code does not refer to the value  that variable x hold before swap was called. It in fact points to our register A. So that line really means  B <-- B xor A. So the registers are now modified to :

A x^y
B y^(x^y)

Now we have something interesting. Let's apply the properties to the register B:

y^(x^y) --P1--> y^(y^x) --P2--> (y^y)^x --P3--> 0^x --P1--> x^0 --P4--> x

Wow! So at this point we have :

A x^y
B x

We are closer to our goal. Now we execute the last line  *x = *x ^ *y which in fact mean to us, using our register definitions, A <-- A xor B :

A (x^y)^x
B  x

Applying similar reasoning to register A:

(x^y)^x = (y^x)^x = y^(x^x) = y^0 = y

That means that now we have:

A y
B x

Voilá! We achieved what we wanted! Registers A and B were swapped  only  with the  help of exclusive-or operations. No extra temporary register was needed.

Friday, August 17, 2012

Using Native Code (JNI) on Android Apps

Android is written in Java and period. You must be able to do everything you need in Java.  But some applications like games using OpenGL will need some extra performance, and therefore they will go native.  As someone who had C++ as the lingua franca  at college, I took special interest on how the Java Native Interface (JNI) works on Android. Thus, I made a small Android app that requests the native layer to sum two integers. In its turn, the native layer displays the result on a TextView.


What do you need:

Preparing the field

First we create a simple activity that has a method with the native qualifier. That tells the JVM  that that method is not implemented in Java but by the native layer on C or C++. With Eclipse and ADT 20 that is pretty easy.


package com.example.testjni;

import android.os.Bundle;
import android.app.Activity;
import android.view.Menu;
import android.widget.TextView;

public class MainActivity extends Activity {

    static {
        System.loadLibrary("teste");
    }
    
    @Override
    public void onCreate(Bundle savedInstanceState) {
        super.onCreate(savedInstanceState);
        setContentView(R.layout.activity_main);
        sum(3,5);
        
    }

    public void setTextView(String text) {
        TextView tv = (TextView)findViewById(R.id.text);
        tv.setText(text);
    }

    @Override
    public boolean onCreateOptionsMenu(Menu menu) {
        getMenuInflater().inflate(R.menu.activity_main, menu);
        return true;
    }
    
    public native int sum(int a, int b);
}

The code above creates a simple activity with a TextView. Line 11 instructs the Dalvik VM to load the shared library teste.so. You will see later that this the name of the library that will be generated to hold the native implementation of the method sum(int,int).  This is done inside a static block so it is executed when the class MainActivity is loaded and therefore before any instance of it is created; so Dalvik can execute the native method when requested.

My intention is that the activity after creating the views will call the native method to calculate the sum of 3 and 5, and then set the TextView with the result.


Generating the Header file

I created a jni folder in the project's directory  to hold all the native code. Now we need to implement the native method. When the native method is called, the JVM will look for C function with a  particular signature. The easiest way to know which signature you should use for your implementation is to use the javah tool from the JDK.


#javah -classpath ./bin/classes:~/Downloads/android-sdk-macosx/platforms/android-16/android.jar -d ./jni com.example.testjni.MainActivity

I ran the command above in the project's folder as above. javah needs the definition of all classes in your program. Thus I set the classpath  to the folder where the class files for my project are put (bin/classes) and I also added the path to the android.jar.  In my case I am using the API level 16, so I picked the right android.jar for it.  the -d parameter tells to output the header file to folder jni.  You need to pass the full qualified name ( i.e., including package name) of the class with the native method.  That command generated the follow header:

/* DO NOT EDIT THIS FILE - it is machine generated */
#include <jni.h>
/* Header for class com_example_testjni_MainActivity */

#ifndef _Included_com_example_testjni_MainActivity
#define _Included_com_example_testjni_MainActivity
#ifdef __cplusplus
extern "C" {
#endif

/*
 * Class:     com_example_testjni_MainActivity
 * Method:    sum
 * Signature: (II)I
 */
JNIEXPORT jint JNICALL Java_com_example_testjni_MainActivity_sum
  (JNIEnv *, jobject, jint, jint);

#ifdef __cplusplus
}
#endif
#endif


Note that even if the code gets compile on C++, the C-linkage is forced for the function, so the JVM can find the method without had to deal with the C++ mangling . C++ supports overloading function and mangles function signatures (embeds  parameters type, class and namespace scopes in the name) in order to support it.


Implementing the native method

I will show the implementation in C and C++.  The reason behind that is  that although the two languages are very similar ( you can compile C code with a C++ compiler),  the JNI  for C++ offer some inline methods to make it more object oriented.

The C code

#include <stdio.h>
#include stdlib.h>
#include <jni.h>
#include <android/log.h>
#include "com_example_testjni_MainActivity.h"


#define LOG_TAG "TesteNativeC"
#define LOGI(...) ((void)__android_log_print(ANDROID_LOG_INFO, LOG_TAG, __VA_ARGS__))

static char* buildString(jint a, jint b, jint sum){
    const char* fmt_string = "The sum of %d and %d is %d";
    const int buffer_size = snprintf(NULL,0,fmt_string,a,b,sum);
    LOGI("Buffer size is %d",buffer_size);
    char* buffer = (char*) malloc((buffer_size+1) * sizeof(char));
    if( buffer != NULL){
        snprintf(buffer,(buffer_size+1),fmt_string,a,b,sum);
    }
        return buffer;
}


JNIEXPORT jint JNICALL Java_com_example_testjni_MainActivity_sum
  (JNIEnv * env, jobject obj, jint a, jint b){
    jint result =  a+b;
    jclass cls = (*env)->GetObjectClass(env, obj);
    jmethodID mid = (*env)->GetMethodID(env, cls, "setTextView", "(Ljava/lang/String;)V");
    if(mid == 0) return 0;
    char* text = buildString(a,b,result);
    if(text != NULL){
        LOGI("At this point string is <<%s>>",text);
        jstring textToDisplay = (*env)->NewStringUTF(env,text);
        (*env)->CallVoidMethod(env, obj, mid, textToDisplay); 
        free(text);
    }
    
    return result;
  }

Function buildString is declared static because it is not intended to be exported, used outside of the library. Its objective is to build the string "The sum of 3 and 5 is 8".  For that, we call function snprintf from the standard C library. Note that I am using snprintf , the "safe-version" of sprintf. The reason for that is to prevent buffer overrun,  a common technique used by attackers to inject malicious .  In our case we don't need to do that because input does not come from external source. However, best practices should always be enforced. snprintf is used twice: first with a NULL parameter  to calculate the size of the necessary buffer to hold the string, and a second time to build the string.

The implementation of the native method follow conventional JNI idioms and it is very similar to using reflection in Java. So I just calculated the sum, retrieved the reference to the setTextView(String) method of the activity, build the string and called the method.  And, this is very important, I  released the allocated char array. NewStringUTF does a copy of the passed char array, so you need to free the buffer to not get a memory leak.


The C++ code

#include <jni.h>
#include <sstream>
#include <string>
#include <android/log.h>
#include "com_example_testjni_MainActivity.h"

#define LOGI(...) ((void)__android_log_print(ANDROID_LOG_INFO, LOG_TAG, __VA_ARGS__))

using std::stringstream;
using std::string;

const char* LOG_TAG = "TesteNativeCpp";

static string buildString(jint a, jint b, jint sum){
    stringstream buffer;
    buffer<<"The sum of "<<a<<" and "<<b<<" is "<<sum;
    return buffer.str();
}

JNIEXPORT jint JNICALL Java_com_example_testjni_MainActivity_sum
  (JNIEnv * env, jobject obj, jint a, jint b){
    jint result =  a+b;
    jclass cls = env->GetObjectClass(obj);
    
    jmethodID mid = env->GetMethodID(cls, "setTextView", "(Ljava/lang/String;)V");
    if(mid == 0) return 0;
    
    string text = buildString(a,b,result);
    LOGI("At this point string is <<%s>>",text.c_str());
    jstring textToDisplay = env->NewStringUTF(text.c_str());
    env->CallVoidMethod(obj, mid,textToDisplay); 

    return result;
  }
  

The C++ code is not much different. I could have used the same code  as of the C version for the function buildString, but I decided to do a code that is closer to latest C++ standards ( Not C++11 yet :-) ). Besides this uses STL containers. Using STL requires extra build config to compile. So I have the chance to show you how to setup the build for that case.

Note that for C++, env works more like an object : if in C we have (*env)->function(env,parameters), in C++ we have env->method(parameters).


Building


Now we need a Makefile for the job. I created the file Android.mk under the jni folder

LOCAL_PATH := $(call my-dir)

include $(CLEAR_VARS)

LOCAL_MODULE    := teste
LOCAL_SRC_FILES := teste.cpp
LOCAL_LDLIBS    := -llog

include $(BUILD_SHARED_LIBRARY)


This makefile is based on the one use for the "hello word" sample of the NDK. LOCAL_MODULE will tell to generate the shared object teste.so. LOCAL_SRC_FILES lists the files to be compiled. cpp extension is required for C++ files. LOCAL_LDLIDS tells to link against the library that allows our native code to output log to logcat.
Remember I said we need extra config to use STL containers. This means to create an Application.mk file besides the Android.mk in the jni folder

APP_STL := stlport_static

This single line sets the  STL library to be linked static.

Now we can build . You just  need to invoke <ndk_folder>/ndk-build on you project folder. This will generate the shared library that will be packaged on you APK. After you have built the library, you just need to build your APK as you would normally do (Eclipse or ant).

And that is the final result :


Monday, August 6, 2012

Why Computer Science is not an Exact Science?

I had a simple task today. Write a comparator for integers. My attempt was:

int compare(int a, int b){
    return a - b;
}


As you know this function must return a negative number if a<b, a positive number if a>b, and zero if both numbers are equal. As in any Exact Science, to show that something is correct you must conduct a proof.

There are three claims to prove:

  • If a < b, the algorithm returns a negative number.
In fact if a<b, then b=a+c, where c is a positive number. Thus a<a+c and  a-b = a-(a+c) = -c, a negative number
  • if a>b, the algorithm returns a positive number.  
Using the same reasoning, a>b => a=b+c => a-b = b+c-b = c, a positive number
  • if a=b, the algorithm returns zero.
Trivially : a=b => a-b = a-a = 0.


But yet, the algorithm is incorrect.
"How come? Didn't you just prove it correct with mathematical rigor?"
Yes, I did. Your professor from the Algorithm Analysis course would like this proof. But as I said, it is completely wrong.  Guess why? Just an small tip : 231-1

Yes! Integer overflow! My biggest mistake here was to assume a,b ∈ ℤ. Actually, they are restricted to (considering VM Java and 32bits for C/C++)  the interval [-231,231-1] . And the math is pretty weird for outsiders: the  sum of two very small negative integers may resulting in a positive number, and the sum of two very big positive numbers may yield a negative number.

"So let us account for the overflows. Let's put a check on your code. If ..."
Hey! Wait! Before complicating the code I want to show you how the Java Library implements the comparison:

 public static int compare(int x, int y) {
     return (x < y) ? -1 : ((x == y) ? 0 : 1);
 }

Imagine my duh! face when I read that.

Two lessons I learned here:
  • Theory is good, but practice is always better.  In theory integers are infinite. In practice they are limited by the word size, and they came in signed and unsigned flavors.  That also applies to more complicated data structures. Your perfect hash function may not be perfect when you consider  the hardware  and software constraints.
  • Do not pre-optimize code,  focus first in making it the most readable as possible.  By trying to making the comparison with a single operation I made it not readable by others at first sight. And worst: instead of saving "microseconds", I introduced a bug.

Sunday, July 8, 2012

Does megapixel count matter when taking photos?


One of the features a point-and-shoot camera will brag about is its megapixel count. Most people will only care about that when buying a new camera. They simply forget or are not aware of the other little details that impact on the image quality.

In order to verify if megapixel count really matters, I did a simple test in extreme low light conditions and saw how the two cameras perform.


Canon Powershot A2200

This is one the cheapest point-and-shoot camera from Canon.  A Q1 2011 camera costing only US$ 99 at Amazon.I managed to pay only R$200 ( I live at Brazil) on Kabum.com.br. I wanted a compact that I could carry with me for every I would go. This was the cheapest camera I found that met the criteria.  It features a 14.1 megapixel sensor, Digic 4 processor and Canon Zoom Lens 5-20mm 1:2.8-5.9 capable of 4x zoom.  Being a cheap camera, it lacks image stabilization, a very important feature for night and zoom shots. Although it is a Canon lens, we cannot expect quality from such tiny lens. And it is made on China, not Japan.

This is photo that I took at night from my bathroom window leaning on the windowsill to prevent shake.  The photo has 4320x3240 pixels, focal length 6.36mm,  F/3.2 8s ISO 80. I wish I could tell the camera to use a smaller aperture, but there is not way of doing that.


Sony Cyber-Shot DSC-H5


Cyber-shot is certainly most popular brand for consumer cameras. But popularity does not necessary reflects good image quality. But in case of this Q1 2006  7.2 megapixels camera it does. Mostly because it features  a Carl Zeiss Vario-Tessar 2.8-3.7/6-72mm lens instead of the common Sony G lens that is used on most of the Cyber-shot lineup. That detail really makes that camera special.  This japanese made camera also has image stabilization.

 A shot taken with the DSC-H5 from the same point: 3072 × 2304, focal length 6mm, F/8, 30s ISO 80


The moment of truth 

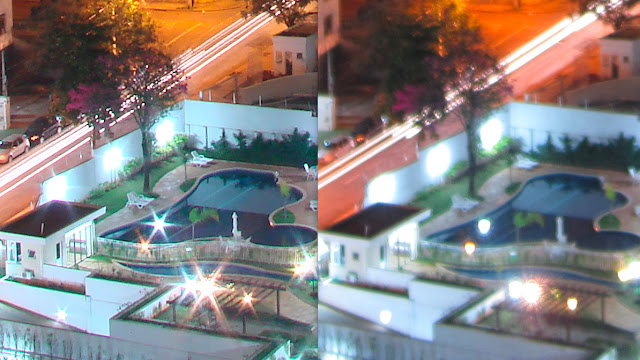
Here is a 100% crop for the DSC-H5 (left side)  along with a crop for the same area from the image captured by the A2200.


DSC-H5 has a shaper image even though the A2200 has almost the double of pixels. Contrast,  exposition and white balance are very similar on both imagse. A2200's image looks like a blurry version of DSC-H5's

Closing Remarks

Megapixel count do matter, but they are not essential. They should be enough to present all the image details in the target format. Agood sensor and quality lens will make the difference.

Saturday, April 7, 2012

First Attempts with Lego Mindstorms NTX 2.0

I knew that Lego have done some robotics kits. You would program a big brick, connect motors and sensors and start the fun. Well, buying the kit at Brazil is pretty expensive: US$ 1000 by today's exchange rate. I found that if I import directly from Amazon  I could get it for US$ 600, import taxes included !


Okay, here is my first robot. It's the basic starter model. I program it to avoid bumping into objects.


My second Robot was the ColorSorter.  That one also comes with the kit.


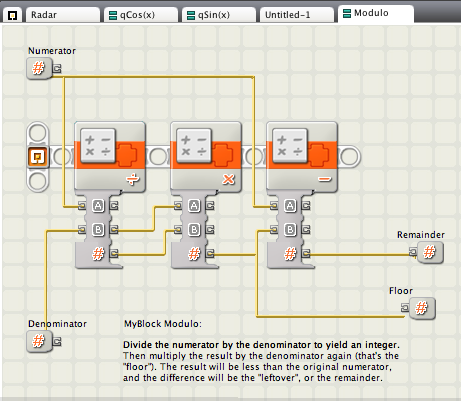
The kit comes with a NXT-G, a graphical programing environment based on LabView from National Instruments. When I said Graphical, I mean you have to drag blocks and make connection to program.  See how hard is only to implement the modulo function :


It is not only hard to people used to program by "typing code", but it also generates big and sluggish programs. And program size really matters as memory is scarce.  The alternative I found was Bricxcc, a Windows IDE for NXC ( Not eXactly C) , a C like language to programming the NXT2.0.

Here is the code for the Color Sorter Robot above. It is a direct translation  of the NXT-G code that comes with the kit. I haven't done any improvements to make the robot smatter.

/*
  Lego color sorter
  Attempt to convert from NXT-G to NXC
*/

#define COLOR_SENSOR SENSOR_3
#define TOUCH_SENSOR1 SENSOR_2
#define TOUCH_SENSOR2 SENSOR_1


#define PRESSED 1
#define NOT_PRESSED 0
#define UNTIL_BUMPED(x)  until((x) == PRESSED);until((x) == NOT_PRESSED);

enum color_t {
  BLUE = INPUT_BLUECOLOR,
  RED = INPUT_REDCOLOR,
  YELLOW = INPUT_YELLOWCOLOR,
  GREEN = INPUT_GREENCOLOR
};


sub initializeSensors(){
    //Color Sensor
    SetSensorColorFull(IN_3);
    //Touch sensor 1
    SetSensorTouch(IN_2);
    //Touch sensor 2
    SetSensorTouch(IN_1);
}


task main(){
     initializeSensors();
     
     OnFwd(OUT_C,50);
     until(TOUCH_SENSOR1 == PRESSED);
     RotateMotor(OUT_C,50,55);
     while(true){
         color_t color  = COLOR_SENSOR;
         
         switch(color){
                       case BLUE:
                            //PlaySound wait for completion
                            OnFwd(OUT_B,50);
                            UNTIL_BUMPED(TOUCH_SENSOR2);
                            RotateMotor(OUT_B,50,0.8*360);
                            Wait(MS_300);
                       break;
                       
                       case RED:
                            //PlaySound
                            RotateMotor(OUT_C,40,90);
                            OnFwd(OUT_B,50);
                            UNTIL_BUMPED(TOUCH_SENSOR2);
                            RotateMotor(OUT_B,50,0.8*360);
                            RotateMotor(OUT_C,40,270);
                       break;
                       
                       case YELLOW:
                            //PlaySound
                            RotateMotor(OUT_C,40,180);
                            OnFwd(OUT_B,50);
                            UNTIL_BUMPED(TOUCH_SENSOR2);
                            RotateMotor(OUT_B,50,0.8*360);
                            RotateMotor(OUT_C,40,180);
                       break;
                            
                       case GREEN:
                            //PlaySound
                            RotateMotor(OUT_C,40,270);
                            OnFwd(OUT_B,50);
                            UNTIL_BUMPED(TOUCH_SENSOR2);
                            RotateMotor(OUT_B,50,0.8*360);
                            RotateMotor(OUT_C,40,90);
                       break;
                       
                       default:
                           //Play Sound - try again
                            OnFwd(OUT_B,50);
                            UNTIL_BUMPED(TOUCH_SENSOR2);
                            RotateMotor(OUT_B,50,0.8*360);

         }
     }
}